


Table of contents
- Introduction to Terraform
- Connection Diagram
- Setting up AWS Provider
- Creating a VPC
- Configuring Subnets
- Internet Gateway
- Route Table (for Internet Access)
- Associate Subnets with Route Table
- Setting Up Security Group
- Creating an EC2 Instance
- Setting Up Target Group
- Setting Up Application Load Balancer (ALB)
- Attaching EC2 Instance to Target Group
- Configuring CloudFront Distribution
Are you interested in streamlining how you set up and manage your AWS infrastructure? Terraform, an Infrastructure as Code (IaC) tool, is here to make your life easier. In this guide, we'll show you how to set up AWS resources using Terraform.
Introduction to Terraform
Terraform is an open-source tool developed by HashiCorp that allows you to define and provision infrastructure using declarative configuration files. It supports multiple cloud providers, including AWS, Azure, Google Cloud Platform, and more.
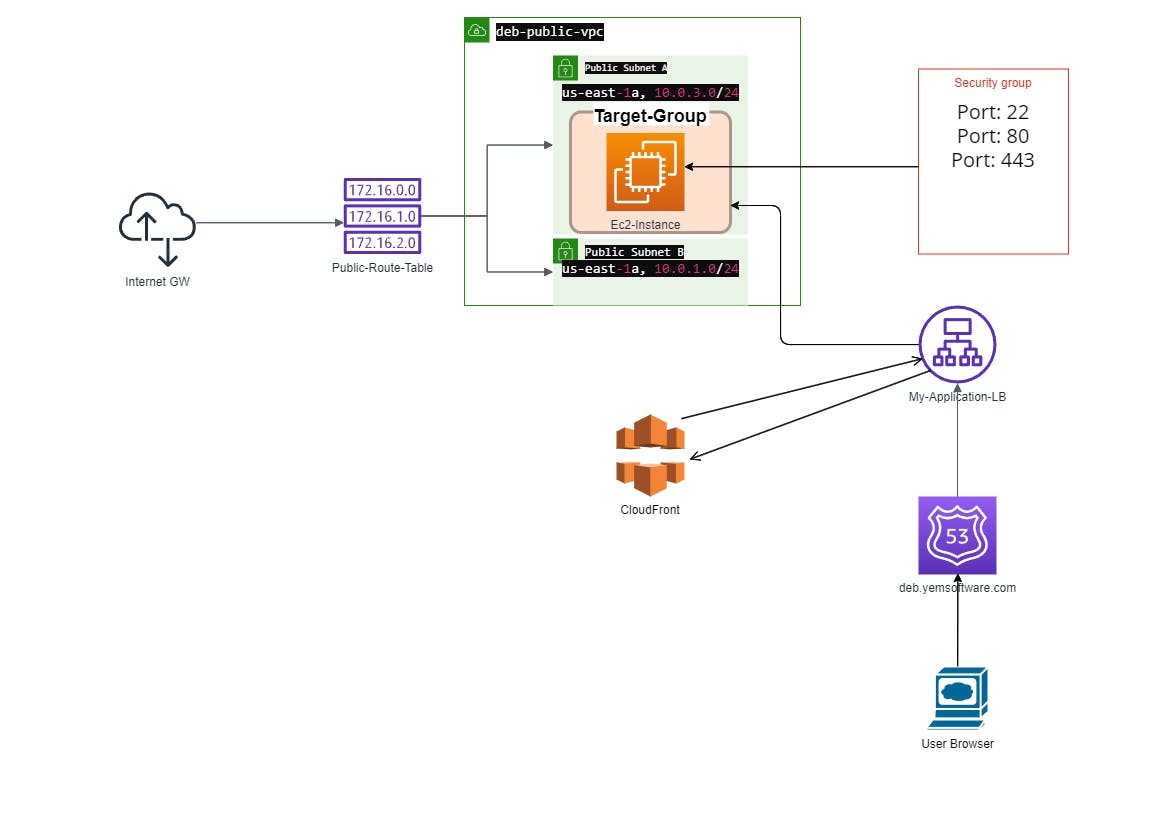
Connection Diagram
Setting up AWS Provider
The first step is to configure the AWS provider in your Terraform configuration. You'll need to specify yourAWS credentialsand the desired**AWS region*. Here's an example of how to define the AWS provider:*
provider "aws" {
  region = "us-east-1"
}
Creating a VPC
Next, let's create aVirtual Private Cloud (VPC)to host our resources. The VPC will define the networking environment for our AWS infrastructure. Here's how to create a VPC with Terraform:
resource "aws_vpc" "main" {
  cidr_block = "10.0.0.0/16"

  tags = {
    Name = "deb-public-vpc"
  }
}
Configuring Subnets
After creating the VPC, we'll configure two public subnets across different availability zones to ensure high availability. Here's an example of how to define subnets:
resource "aws_subnet" "public_a" {
  vpc_id            = aws_vpc.main.id
  cidr_block        = "10.0.3.0/24"
  availability_zone = "us-east-1a"
  map_public_ip_on_launch = true

  tags = {
    Name = "deb-public-subnet-a"
  }
}

resource "aws_subnet" "public_b" {
  vpc_id            = aws_vpc.main.id
  cidr_block        = "10.0.1.0/24"
  availability_zone = "us-east-1b"
  map_public_ip_on_launch = true

  tags = {
    Name = "deb-public-subnet-b"
  }
}
Internet Gateway
To enable internet access for resources within the VPC, we'll attach an Internet Gateway. This will allow our instances to communicate with the internet. Here's how to create an Internet Gateway:
resource "aws_internet_gateway" "gw" {
  vpc_id = aws_vpc.main.id

  tags = {
    Name = "deb-internet-gateway"
  }
}
Route Table (for Internet Access)
We need to associate the Internet Gateway with the route table to enable internet access for resources in the public subnets. Here's how to define the route table:
resource "aws_route_table" "public" {
  vpc_id = aws_vpc.main.id

  route {
    cidr_block = "0.0.0.0/0"
    gateway_id = aws_internet_gateway.gw.id
  }

  tags = {
    Name = "deb-public-route-table"
  }
}
Associate Subnets with Route Table
Finally, we'll associate the public subnets with the route table to enable internet access for instances deployed in those subnets. Here's how to do it:
resource "aws_route_table_association" "public_assoc_a" {
  subnet_id      = aws_subnet.public_a.id
  route_table_id = aws_route_table.public.id
}

resource "aws_route_table_association" "public_assoc_b" {
  subnet_id      = aws_subnet.public_b.id
  route_table_id = aws_route_table.public.id
}
Setting Up Security Group
To control inbound and outbound traffic to our EC2 instance, we'll create a security group. This security group will allow HTTP, HTTPS, and SSH traffic.
# Security Group for EC2 (Allow HTTP, HTTPS, SSH)
resource "aws_security_group" "web_access" {
  name        = "allow_web"
  description = "Allow HTTP/HTTPS and SSH traffic"
  vpc_id      = aws_vpc.main.id

  # Allow inbound traffic on port 22 for SSH
  ingress {
    from_port   = 22
    to_port     = 22
    protocol    = "tcp"
    cidr_blocks = ["0.0.0.0/0"]
  }

  # Allow HTTP traffic
  ingress {
    from_port   = 80
    to_port     = 80
    protocol    = "tcp"
    cidr_blocks = ["0.0.0.0/0"]
  }

  # Allow HTTPS traffic
  ingress {
    from_port   = 443
    to_port     = 443
    protocol    = "tcp"
    cidr_blocks = ["0.0.0.0/0"]
  }

  # Allow outbound traffic to anywhere
  egress {
    from_port   = 0
    to_port     = 0
    protocol    = "-1"
    cidr_blocks = ["0.0.0.0/0"]
  }
}
Creating an EC2 Instance
Now, let's deploy an EC2 instance in one of the public subnets. This instance will serve as our web server. Here's how to define the EC2 instance in Terraform:
# EC2 Instance
resource "aws_instance" "web_server" {
  ami                    = "ami-080e1f13689e07408"
  instance_type          = "t2.micro"
  subnet_id              = aws_subnet.public_a.id

  # Add security group
  vpc_security_group_ids = [aws_security_group.web_access.id]

  tags = {
    Name = "deb-web-server"
  }
}
Setting Up Target Group
To route traffic from the ALB to our EC2 instances, we need to define a target group. The ALB will forward incoming requests to this target group based on the configured rules.
# Target Group
resource "aws_lb_target_group" "web_tg" {
  name        = "my-web-target-group"
  protocol    = "HTTP"
  port        = 80
  vpc_id      = aws_vpc.main.id

  health_check {
    path = "/"
  }
}
Setting Up Application Load Balancer (ALB)
To distribute incoming application traffic across multiple targets, such as EC2 instances, we'll set up an Application Load Balancer (ALB). The ALB will intelligently route traffic to healthy instances based on configured rules.
# ALB
resource "aws_lb" "main" {
  name                = "my-application-lb"
  internal            = false
  load_balancer_type  = "application"

  # Add both subnets
  subnets             = [aws_subnet.public_a.id, aws_subnet.public_b.id]

  security_groups     = [aws_security_group.web_access.id]
}
Attaching EC2 Instance to Target Group
To route traffic from the ALB to our EC2 instance, we need to attach the instance to a target group. This allows the ALB to direct traffic to the instance based on the configured rules.
# Attach target to Target Group
resource "aws_lb_target_group_attachment" "web_server_attachment" {
  target_group_arn = aws_lb_target_group.web_tg.arn
  target_id        = aws_instance.web_server.id
  port             = 80
}
Configuring CloudFront Distribution
To improve the performance and availability of our application, we can use Amazon CloudFront as a content delivery network (CDN). CloudFront caches content at edge locations worldwide, reducing latency for users accessing our application.
# CloudFront Distribution
resource "aws_cloudfront_distribution" "my_cdn" {
  origin {
    domain_name = aws_lb.main.dns_name # Get the ALB's DNS name
    origin_id   = "my_alb_origin"

    custom_origin_config {
      http_port               = 80
      https_port              = 443
      origin_protocol_policy  = "http-only"
      origin_ssl_protocols    = ["TLSv1.2"]
    }
  }

  enabled             = true
  is_ipv6_enabled     = true
  default_root_object = "index.html" # If needed

  default_cache_behavior {
    allowed_methods     = ["DELETE", "GET", "HEAD", "OPTIONS", "PATCH", "POST", "PUT"]
    cached_methods      = ["GET", "HEAD"]
    target_origin_id    = "my_alb_origin"
    viewer_protocol_policy = "allow-all"

    forwarded_values {
      query_string = false
      cookies {
        forward = "none"
      }
    }
  }

  restrictions {
    geo_restriction {
      restriction_type = "none"
    }
  }

  viewer_certificate {
    cloudfront_default_certificate = true # Use default CloudFront cert (for basic usage)
  }
}
Conclusion:
By following these steps, you can easily configure AWS resources using Terraform, providing a reliable and repeatable method for infrastructure management. With Terraform's declarative syntax and extensive provider support, you can streamline your AWS infrastructure deployment process and focus on building scalable and reliable applications.